일반적으로 Consul은 서비스 간 통신할 때 아래와 같이 동작한다.

위 방식은 사용 가능한 모든 서비스에 트래픽을 분산시킬 수 있기 때문에 대부분의 환경에서는 문제가 되지 않는다.
그러나 어떤 상황에서는 서비스 간 호출 대기 시간을 줄이거나, 가용 영역 간 데이터 전송 비용을 줄이기 위해 트래픽이 동일한 가용 영역 내에 유지되도록 하고 싶을 수 있다.
이 문제를 해결하기 위해 Consul 1.17 버전에서는 locality-aware routing에 대한 기능을 도입했다.
locality-aware routing 기능을 적용하면 아래와 같이 동작하게 된다.

서비스 호출 시 트래픽을 같은 영역 내에 유지함으로써 서비스 간 대시 시간을 줄여 서비스 성능을 향상하고, 트래픽 비용을 절감할 수 있다.
같은 영역 내 서비스에서 장애가 발생할 경우 아래와 같이 Service Mesh는 자동으로 인접 영역의 정상 서비스로 장애조치 되어 데이터 센터 내 가용성을 보장한다.

본 글에서는 위 시나리오 기반 구성하는 실습을 다룬다.
참고
해당 기능은 Consul Enterprise에서 사용할 수 있다.
구성 환경
- Amazon EKS 클러스터 v1.27.7
- Consul v1.17-ent
- Consul Enterprise license
- Consul Helm Chart 버전 1.3.1
- Helm Cli v3.8.2
1. Consul 구성
Consul Helm repo를 등록한다.
$ helm repo add hashicorp https://helm.releases.hashicorp.com
$ helm repo update
Consul 라이센스를 적용한다.
# license.yaml
apiVersion: v1
data:
  key: {license key base64 incoding}
kind: Secret
metadata:
  name: license
  namespace: consul
위 라이센스 파일을 적용한다.
$ kubectl apply -f license.yaml
Consul의 Helm Chart values 파일을 작성한다.
# consul-values.yaml
global:
  datacenter: dc2
  peering:
    enabled: true
  enterpriseLicense:
    secretName: license
    secretKey: key
  adminPartitions:
    enabled: true
    name: "default"
  enableConsulNamespaces: true
  image: hashicorp/consul-enterprise:1.17.1-ent
  metrics:
    enabled: true
    enableAgentMetrics: true
    agentMetricsRetentionTime: '1m'
  tls:
    httpsOnly: false
    enabled: true
    enableAutoEncrypt: true
    verify: false
  acls:
    manageSystemACLs: true
  gossipEncryption:
    autoGenerate: true
server:
  replicas: 1
  exposeGossipAndRPCPorts: true
dns:
  enableRedirection: true
  enabled: true
connectInject:
  enabled: true
  consulNamespaces:
    mirroringK8S: true
controller:
  enabled: true
ingressGateways:
  enabled: true
  defaults:
    replicas: 1
terminatingGateways:
  enabled: true
  defaults:
    replicas: 1
meshGateway:
  enabled: true
  replicas: 1
위에서 작성한 "consul-values.yaml" 파일로 Consul을 설치한다.
$ helm upgrade -i -n consul consul -f consul-values.yaml hashicorp/consul --version 1.3.1 --create-namespace
proxydefaults 파일을 작성한다.
# proxydefaults.yaml
apiVersion: consul.hashicorp.com/v1alpha1
kind: ProxyDefaults
metadata:
  name: global
spec:
  meshGateway:
    mode: local
proxydefaults를 적용한다.
$ kubectl apply -f proxydefaults.yaml
static-client 서비스를 배포를 위해 yaml파일을 작성한다.
# static-client.yaml
apiVersion: consul.hashicorp.com/v1alpha1
kind: ServiceDefaults
metadata:
  name: static-client
spec:
  protocol: 'http'
---
apiVersion: v1
kind: Service
metadata:
  name: static-client
spec:
  selector:
    app: static-client
  ports:
    - port: 80
---
apiVersion: v1
kind: ServiceAccount
metadata:
  name: static-client
---
apiVersion: apps/v1
kind: Deployment
metadata:
  name: static-client
spec:
  replicas: 1
  selector:
    matchLabels:
      app: static-client
  template:
    metadata:
      name: static-client
      labels:
        app: static-client
      annotations:
        'consul.hashicorp.com/connect-inject': 'true'
    spec:
      containers:
        - name: static-client
          image: curlimages/curl:latest
          command: ['/bin/sh', '-c', '--']
          args: ['while true; do sleep 30; done;']
      serviceAccountName: static-client
static-client 서비스를 배포한다.
$ kubectl apply -f static-client.yaml
배포된 static-client Pod가 배포된 노드를 확인한다.
$ kubectl get po static-client-7bbffb9f6d-lt6f4  -o wide
NAME                             READY   STATUS    RESTARTS   AGE    IP           NODE                                            NOMINATED NODE   READINESS GATES
static-client-7bbffb9f6d-lt6f4   2/2     Running   0          3h6m   10.10.2.64   ip-10-10-2-16.ap-northeast-2.compute.internal   <none>           <none>
AWS의 각 노드의 zone을 확인한다.
- 해당 글에서 static-client 서비스는 "ap-northeast-2b"에 위치해 있다.
$ kubectl get nodes -o jsonpath='{range .items[*]}[node name] {.metadata.name}{"\t"} [region] {.metadata.labels.topology\.kubernetes\.io/region}{"\t"} [zone] {.metadata.labels.topology\.kubernetes\.io/zone}{"\n"}{end}'
[node name] ip-10-10-1-121.ap-northeast-2.compute.internal       [region] ap-northeast-2         [zone] ap-northeast-2a
[node name] ip-10-10-2-16.ap-northeast-2.compute.internal        [region] ap-northeast-2         [zone] ap-northeast-2b
[node name] ip-10-10-3-89.ap-northeast-2.compute.internal        [region] ap-northeast-2         [zone] ap-northeast-2c
각 노드에 Pod를 분산하여 배포하기 위해 아래와 같이 static-server를 배포한다.
# static-server.yaml
apiVersion: consul.hashicorp.com/v1alpha1
kind: ServiceDefaults
metadata:
  name: static-server
spec:
  protocol: 'http'
---
apiVersion: v1
kind: Service
metadata:
  name: static-server
spec:
  selector:
    app: static-server
  ports:
    - protocol: TCP
      port: 8080
      targetPort: 8080
---
apiVersion: v1
kind: ServiceAccount
metadata:
  name: static-server
---
apiVersion: v1
kind: Pod
metadata:
  name: static-server1
  labels:
    app: static-server
  annotations:
    consul.hashicorp.com/connect-inject: "true"
spec:
  containers:
    - name: static-server
      image: hashicorp/http-echo:latest
      args:
        - -text="i'm server1"
        - -listen=:8080
      ports:
        - containerPort: 8080
          name: http
  serviceAccountName: static-server
  nodeName: ip-10-10-3-89.ap-northeast-2.compute.internal
---
apiVersion: v1
kind: Pod
metadata:
  name: static-server2
  labels:
    app: static-server
  annotations:
    consul.hashicorp.com/connect-inject: "true"
spec:
  containers:
    - name: static-server
      image: hashicorp/http-echo:latest
      args:
        - -text="i'm server2"
        - -listen=:8080
      ports:
        - containerPort: 8080
          name: http
  serviceAccountName: static-server
  nodeName: ip-10-10-2-16.ap-northeast-2.compute.internal
---
apiVersion: v1
kind: Pod
metadata:
  name: static-server3
  labels:
    app: static-server
  annotations:
    consul.hashicorp.com/connect-inject: "true"
spec:
  containers:
    - name: static-server
      image: hashicorp/http-echo:latest
      args:
        - -text="i'm server3"
        - -listen=:8080
      ports:
        - containerPort: 8080
          name: http
  serviceAccountName: static-server
  nodeName: ip-10-10-1-121.ap-northeast-2.compute.internal
- static-client Pod와 같은 위치에 있는 Pod는 static-server2이다.
$ kubectl get po -o wide static-server1 static-server2 static-server3
NAME             READY   STATUS    RESTARTS   AGE   IP            NODE                                             NOMINATED NODE   READINESS GATES
static-server1   2/2     Running   0          27s   10.10.3.228   ip-10-10-3-89.ap-northeast-2.compute.internal    <none>           <none>
static-server2   2/2     Running   0          27s   10.10.2.41    ip-10-10-2-16.ap-northeast-2.compute.internal    <none>           <none>
static-server3   2/2     Running   0          27s   10.10.1.19    ip-10-10-1-121.ap-northeast-2.compute.internal   <none>           <none>
서비스 간 트래픽 허용을 위해 serviceintention을 설정한다.
# intentions.yaml
apiVersion: consul.hashicorp.com/v1alpha1
kind: ServiceIntentions
metadata:
  name: static-server-intention
spec:
  destination:
    name: static-server
  sources:
   - name: "*"
     action: deny
   - name: static-client
     action: allow
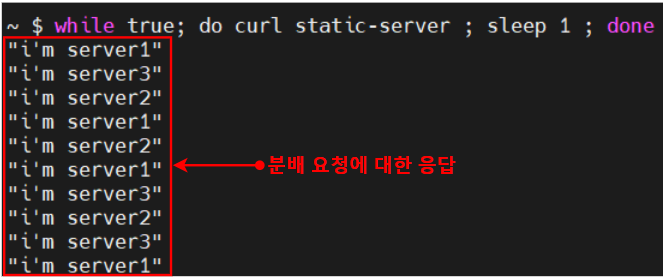
static-client 서비스에 접근하여 static-server로 호출한다.
$ kubectl exec -it deploy/static-client -c static-client -- /bin/sh
아직 locality-aware routing 기능을 적용하지 않았기 때문에 static-server 서비스에 대해 분산된 응답을 받는 걸 확인할 수 있다.
2. locality-aware routing 적용 및 테스트
locality-aware routing기능 적용을 위해 아래와 같이 proxydefaults 파일을 작성한다.
# proxydefaults.yaml
apiVersion: consul.hashicorp.com/v1alpha1
kind: ProxyDefaults
metadata:
  name: global
spec:
  meshGateway:
    mode: local
# 아래 추가
  prioritizeByLocality:
    mode: failover
작성한 proxydefaults 파일을 적용한다.
$ kubectl apply -f proxydefaults.yaml
static-client 서비스에 접근하여 static-server로 호출한다.
$ kubectl exec -it deploy/static-client -c static-client -- /bin/sh
같은 zone(ap-northeast-2b)에 있는 static-server2 Pod를 호출하는 걸 확인할 수 있다.

$ kubectl delete po static-server2
static-server2 Pod가 삭제된 후 static-server1, static-server3로 트래픽을 분산시키는 걸 확인할 수 있다.

'Service Mesh > Consul' 카테고리의 다른 글
| [Consul] Peering 환경에서 데이터 센터 간 Failover 구성 (0) | 2024.02.07 |
|---|---|
| [Consul] Cluster Peering을 통한 데이터 센터 간 통신 (7) | 2024.02.07 |


댓글